
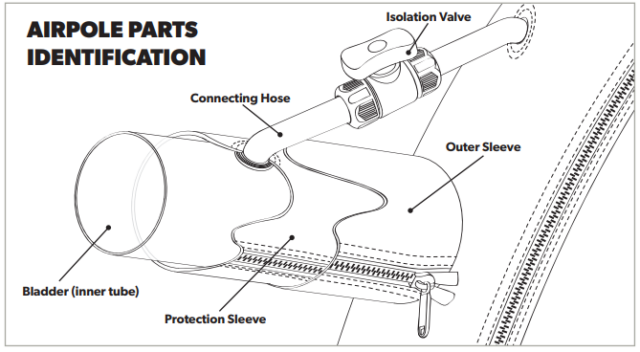
How to repair or replace an airpole
02 September 2024
Read More ![]()
Summer Sale
2 September 2024

2 September 2024
Try ‘Weathering’ – or you could let the ‘weather in’!
Today’s new tents and awnings have the benefit of the latest materials technology, all the accumulated manufacturers’ knowledge, experience and testing from developing previous products over the years – plus ‘real-use’ testing and feedback from all of their customers and distributor network…so what could possibly go wrong? One thing that can often catch tent and awning users out is the fact that these products require ‘weathering’ before actually being used to sleep in for the first time – here’s why…
The outer skins of tents and awnings involve sheets of waterproof material being slightly overlapped then sewn together to form the shape of the structure and the joins created by this process are called seams. Along all seams then, an industrial sewing machine has made rows of needle holes into which strong thread is stitched, to hold them together. The same applies where zips and other features are attached to the main cover – holes with thread inserted through them.
At the time of manufacture, these needle holes are slightly bigger than the thickness of the thread running through them. Although small, these holes are big enough for moisture to pass through, especially when there’s heavy rain – so rain gets into the tent… at first. Because something really useful then happens – when the thread gets wet a few times it expands to fill the needle holes and blocks the water from getting through.
So, much better than letting this all happen when you’re trying to get a good night’s sleep on a rainy night pitched at a campsite, you’d be better ‘weathering’ your new tented structure in advance of using it. Agree?
To do this…
1. Set up your new tent or awning at home, before using it (a pretty sensible thing to do in any case rather than set it up for the first time with all your new campsite neighbours watching over their mugs of tea!).
2. Use a hosepipe and allow the outer skin of the tent or awning to get completely soaked, then leave it until it’s fully dried. Ideally, repeat this process two or three times to ensure that the seams become completely watertight.
3. Ensure that the structure is completely dry before packing up again.
PLEASE NOTE: Although this weathering process is particularly needed for tents and awnings made from Polycotton, we would join manufacturers in advising customers to proof all new tents and awnings against water ingress, as suggested above – regardless of the type of waterproof material used, even with synthetic Polyester materials when seams will more than likely be taped to prevent water seepage.
After this weathering process has been carried out you can rely upon your tent or awning to perform to its full potential in accordance with the manufacturer’s guidelines – so happy camping and caravanning!
(Footnote: If water entering your tent or awning is still an issue after it’s been weathered properly, take a look at our videos on how to avoid Condensation when camping – a subject that comes up many, many times when talking to customers in-person and over the phone!)
02 September 2024
Read More ![]()
02 September 2024
Read More ![]()
Sign up and get the best offers, events, news and our monthly giveaway straight to your inbox.